This afternoon I began investigating tooling for the mill. Usually the first thing I do when I’m looking for anything is find the best community of experienced but clueless schulbs like myself. I have found them at www.cnczone.com. This is a great forum for small mill machinists.
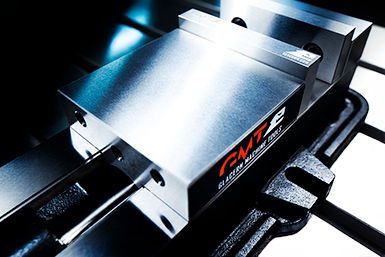
I've decided to order the following vise for my mill tooling setup;
Obviously the first thing I need is a decent vise. There is no reason to skimp on the vise. Hell, if it can’t hold things straight and parallel then what is the point of having it. Therefore, I opted for the quasi American made 4” standard vise by, Glecern. My mill accepts ½“ t-bolts so I believe fit-up should not be an issue. I‘ll be sure to bitch on this blog if something goes wrong with the vise purchase, but I do not see that happening. The guys at cnczone really like this vise.
I will need a test gauge to tram this crap Chinese mill. I have a milling tolerance goal of .001 inches. Therefore, I think it is reasonable to have a test indicator capable of reading .0005 inches. I found this one on Amazon, reviews seem positive.
Let’s give it a go. From what I’ve read on cnczone, Interapid is the cool name brand dial indicators. Meh, I’m cheap lets go with this one. If anyone is interested in comparing dial gauge brands; here is a good link; http://www.longislandindicator.com/p37.html
This link suggests the only thing worth buying is Switzerland produced and assembled.
Today I gave some thought about building the coaster cars. Specifically, how will I build them? The answer will be a Grizzly SX3 end mill/drill. I’m driving to PA this Friday to pick it up! Woo.
Grizzly- SX-0619
The goal is to manually operate the mill until I save enough funds to go full CNC. It seems the aftermarket industry has produced a healthy supply and competitive market for CNC adaptation kits, controllers and stepper motors. In the future I will be looking at obtaining a full CNC setup.
6/5/2014
I changed my mind. The hobby community seems to have a healthier community tinkering with the Grizzly 0704 mill. Muncy PA here I come! Left 2am from Roanoke, made it back to town at 3pm with this in the truck.
Woo! Too tired to tinker right now. We’ll unload it tomorrow.
6/6/2014
Getting the mill out of the truck was a challenge, especially for one person.
I have no idea how to take this thing apart, but what the hell I have to learn the inner workings of this China crap anyway.
Bam! Let's hope I can get it back together.
I used some WD-40 to clean up the protective goo that was applied in China before it was placed on a cargo ship to arrive in the grand US of A. This mill uses conventional steel beveled ‘ways’ (guiding bars) and tapered Gib (alignment part), they will need to be oiled consistently to provide snag free operation.
6/7/2014
Today I focused on reassembling the machine. Here is a photo of the mill together in full upright position.
The instruction manual provides a break-in routine for the spindle; I guess I should do that. So I sat around for an hour watching to make sure nothing went wrong while the spindle got its first 2200 rpm revs, sweet.
Hello world. Yes, I know this is strange, but I have an uncanny obsession with roller coasters. So much so I am determined to build the most accurate working replica of a wooden coaster. And I will do this in my basement. Each day I will blog about my thinking, sketches, progress and lessons learned. Hopefully this journey will inspire you to take on the challenge as I did with much less frustration.
Tonight I decided, yes, yes I am going to pursue this dream. In the past I have dabbed around with creating a working model but was not successful. I'll display some photos in a future post. Simply put, I lost interest and the project stopped, but the dream inside is still alive and healthy.
From what I can recall from memory, the hardest part of creating the working model was understanding the physics behind the beast. At that moment in time, I believe I was just entering high-school and was barley equipped with the knowledge of basic algebra and far from the laws of motion and structural engineering I now competently understand. Looking back upon my first attempt, I’m quite impressed with my young naive mind. But it was a failure because I did not have the knowledge to make it work.
Blah blah blah, ok let’s get this dream started,
The first step of creating this model is to lay out a track design that has the potential to successfully roll completely around the track. And for this task we will use, you guessed it, math! But, before we do the math we need to choose a scale at which to design. In other words, how small do we want this model to be? Scale is of concern. Too small and construction will be tedious, the cars may not have enough inherent momentum to roll and the model would look boring. Too large and; well who wouldn't want a full size coaster is their basement. Seriously too large and it’s just not practical.
I came across this YouTube video and became extremely jealous of the owner and builder of this awesome model.
He used a 1/32 scale. Because I love plagiarizing (how do you think I got through school folks) I will use this as a base scale for my model. Unfortunately limited information is available about the Colorado Avalanche model on the internet. Determining piece sizes, the way the chain works, what the cars look like, what is used for the wheels and many other details are unknown. All we know is this guy did it, and I am way smarter than that dude.
Tonight I also began dabbing with determining relative scale of construction timber used for wooden coaster construction. Whether it’s a security issue, proprietary information or simply not knowing where to ask, I expect finding full construction documents of a modern wooden coaster to be difficult. Therefore, I need to improvise. I found some photos of a wooden coaster under construction on the internet. Using MicroStation V8i I imported them in as a raster image. Basically, these photos acted as a background for me to draw on in computer space which is infinitely scale-able. As this foreshadows, I was able to determine relative sizing of members by scaling and sketching over this simple photo.
A scouring of coaster enthusiast forums has turned up the most common track gauge width, i.e. the spacing between rails is 48 inches. That seems about right. I’ll use it.
We want to build a model. So scaling this down to 1/32 scale gives us smaller workable pieces. Now, what wood should I use for construction? Balsa, it’s light and sturdy.
Tomorrow I will work a bit more on layout and design. Later.